
Submit: Add Image
The data entered on the Add Image screen provides information about the image to upload, the specimen to which the image belongs, and its view. Both a specimen and a view should exist before uploading an image. If not previously added, provisions have been made on this screen to add a specimen and a view.
Are you uploading more than 1 image of the same specimen? Note that the Specimen record in Morphbank displays the first image uploaded for a given specimen. Morphbank suggests using the image that best represents the overall specimen - this is referred to in Morphbank as the standard image. After uploading all images for a given Specimen, a user can edit the Specimen record to change the standard image for the Specimen.
Image Issues
- The image file should be in the form of (bitmap [.bmp], joint photographic experts group [.jpeg, .jpg], and tag information file format [.tiff]).
- (Phillips SEM users see warning notation in the Image to Upload and Magnification sections below.
- For tiff images with color format = grayscale, see note in the Image to Upload section).
Path to Add Image: header menu > Tools > Submit > Image
N.B. If a user belongs to more than one Morphbank Group - be sure to select the group for this Image before upload.
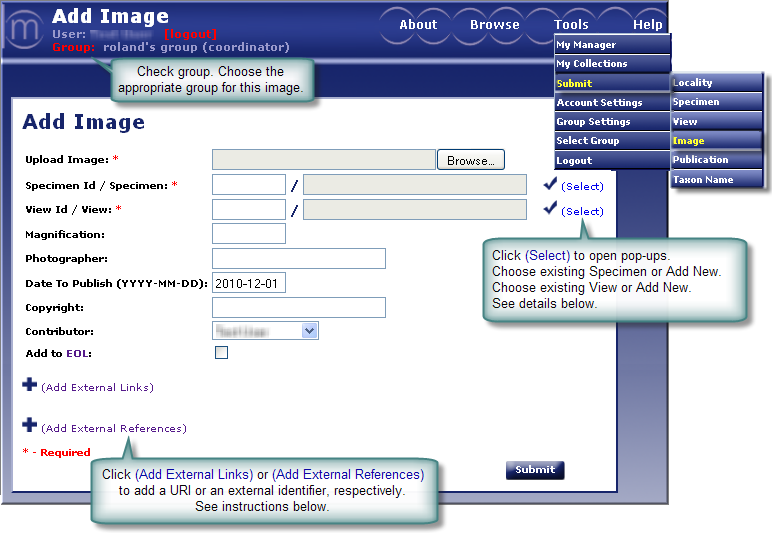
- Image to Upload (Required)
Browse or enter the location and name of the image to upload. Image files to upload need file extensions of (bitmap [.bmp], joint photographic experts group [.jpeg,. jpg] or tag information file format [.tiff]). - Specimen (Required)
Enter the specimen from which the image was taken. To insure accuracy, specimen names need to be selected from Specimens selection
screen. The specimen must exist before you can add an image.
from Specimens selection
screen. The specimen must exist before you can add an image.
- Views (Required)
Enter the view describing the image to be uploaded. To insure accuracy, views need to be selected from the Views selection screen. A view must exist before uploading an image. - Magnification
Enter a positive decimal number that corresponds to the magnification of the image. The magnification is calculated by dividing the size of an object as it appears on the image (when the image is rendered at normal or native size [100 %]) by the actual size of the object. Example: if the leg of the specimen is 0.5 mm long and on the image it appears to be 20 mm long, the magnification is 20/0.5 =40. Please make sure you specify the magnification for all images, particularly if you do not have a scale bar in them. - Date to Publish
Enter the release date for the images. The release date can be maximally five years from the date of inclusion of the images in Morphbank. If you leave this field unchanged, the default date is 6 months from inclusion of the images in Morphbank. - Contributor (Required)
Select the name of the contributor (person having the authorization to release the images) from the dropdown list. The contributor can be different from the submitter (person entering the data). If you need to add new entries to this list, please contact mdadmin at scs dot fsu dot edu - Add to EoL
Encyclopedia of Life (EoL) collaborates with Morphbank and desires images that exemplify a given taxa. Morphbank users contribute images to EoL unless the images are already being supplied from another source, or the images are not exemplar. Morphbank images have a date-to-publish and only go to EoL after that date. Please tick the box to share the image with EoL. Users may edit this field at any time. - Add External Links to this record. For complete
instructions on providing external links refer to External Linking in the Information Linking section of this manual. Click on Add External Links to open this feature. See next:
- Choose the Type of External Link (some examples are: GenBank, Project, Institution, ...)
- Enter the text for the Label the user in Morphbank will click to go to this URL.
- Enter the complete URL here.
- The Description field is optional.
- Click the + icon to add additional external links.
- Click the - icon to remove any outdated links.
- Add External References to this record. For complete
instructions on providing external references refer to External Linking in the Information Linking section of this manual. Click on Add External References to open this feature. See next:
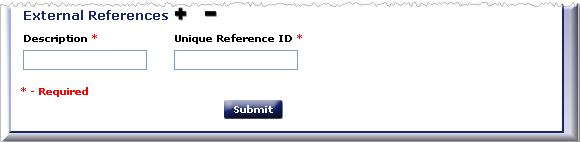
- Enter the Description for the External Reference. This will appear to the Morphbank user as a label in front of the unique id.
- Enter the Identifier unique for this locality in the remote database in the Unique Reference ID field.
To Fix: The images need to be resized from 1424X968 to 1424X1064 for high resolution images and 712X484 to 712X532 for standard resolution. Philips has a small conversion program called XL-Stretch or images can be resized manually with image manipulation software such as Photoshop.
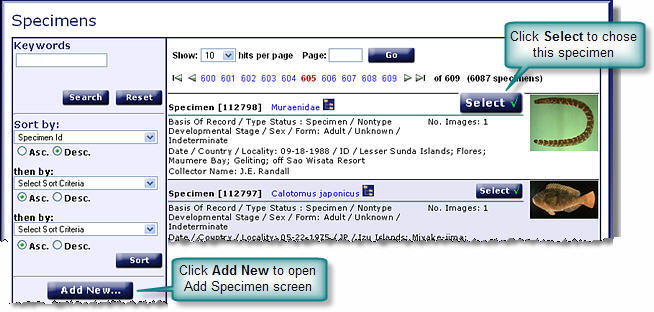
To sort the list of specimens, select the Sort By criteria from the drop down list(s). The more criteria selected, (up to 3 levels) the more refined the sort will be.
To add a new specimen that is not in the Specimens selection screen, select the
 icon. This will open the
Add Specimen screen. (See the Add Specimen
section of this manual for help in completing this form). When the new specimen is submitted, the screen will redirect back
to the Add Image page where the new specimen will automatically be
entered and the process of adding an image can continue where the user
left off.
icon. This will open the
Add Specimen screen. (See the Add Specimen
section of this manual for help in completing this form). When the new specimen is submitted, the screen will redirect back
to the Add Image page where the new specimen will automatically be
entered and the process of adding an image can continue where the user
left off.

To sort the list of views, select the Sort By criteria from the drop down list(s). The more criteria selected, (up to 3 levels) the more refined the sort will be.
To add a new view that is not in the Views selection screen, select the
icon; This will direct the user to the Add View screen.
(See the Add View section of this manual for help in completing this form.)
When the new view is submitted, the screen will redirect back to the Add
Image page where the view will be automatically entered and the process
of adding an image can continue where the user left off.
To Fix: If the machine is calibrated correctly for high-resolution tiff digital output then the magnification will be correct. However, not all SEM machines are calibrated in this manner and your SEM technician should be consulted. It is also suggested to print a scale bar on all images.

- Unique Reference ID best practice is to combine an acronym prefix + an identifier.
- The database table storing this identifier requires the values be unique. If the identifier string entered is already in this table, the user will have to figure out a different prefix.
- For example, a user, Fred S Unstead, has a Image with ID=123456 and puts his initials as the prefix for: FSU:123456
- Florida State University (FSU) entered Image IDs with prefix: FSU + an identifier (123456).
- Fred S Unstead needs to change his prefix in some way, for example: FSU-I:123456 (where the I is for Image).
- The external unique reference ID can be used in future uploads and for updates of current records in Morphbank.
When the Add Image form has been completed, Submit to complete the add image process. A message will confirm that you have successfully added an image. From this point the user can edit the image information just submitted, continue to add additional images or click return (goes to the front page of Morphbank) or click on the desired destination using drop-downs in the Header Menu.
Next |
Contents |