
Submit: Add View
The data entered on the Add View screen provides information about the view of the specimen to include imaging technique, preparation technique, specimen part, sex, form, developmental stage, view angle and highest taxon to which this view is applicable. A view and specimen must exist before an image is uploaded.
Path to Add View: header menu > Tools > Submit > View
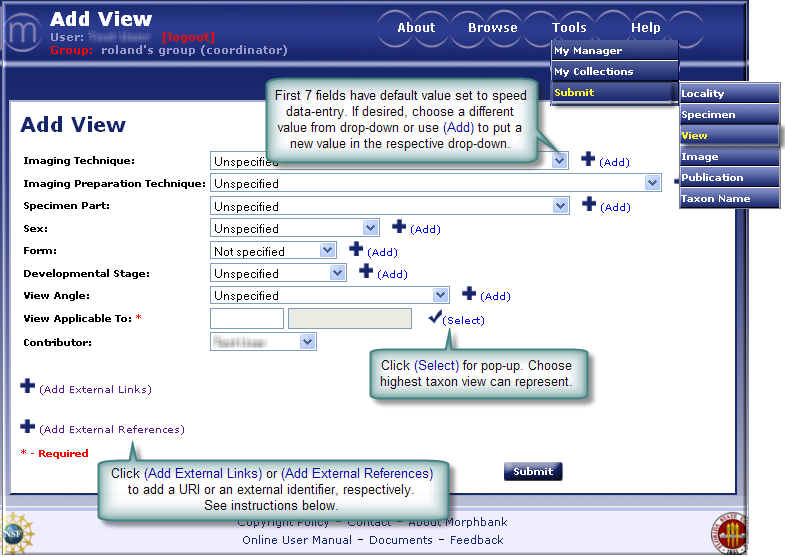
Forms in Morphbbank's latest version (3.0) use javascript and default values to speed data-entry for the online user. Note in the Add View screen, the first 7 fields are default to Unspecified or Not specified. The user may leave those and only change the desired fields and add terms as necessary to each of the drop-downs. Once a user clicks Submit, they are easily able to add another very similar view if needed.
- Imaging Technique, Imaging Preparation Technique,
Specimen Part, Sex, Form,
Developmental Stage, and View Angle
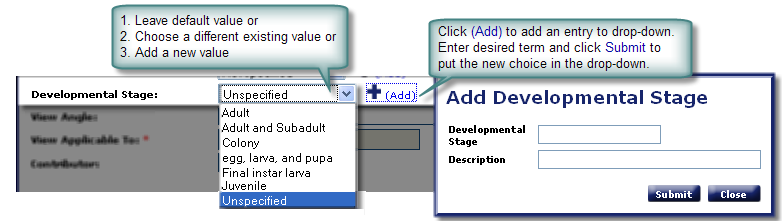
All of these fields work in the same manner. Options can be added to any of these drop-downs by selecting the add icon.
This process is available only for those authorized through login permissions.
icon.
This process is available only for those authorized through login permissions.
Choose one of the options from the drop-down list for each of the 7 fields. The drop-down lists contain terms based on community consensus. The choices for Sex might consist of: Male, Female, Bisexual, Indeterminate (if the specimen was examined but the sex could not be determined), Unknown (if the specimen was not examined for its sex), Transitional (if the specimen is between sexes, like sequential hermaphrodites).
If the option desired is not in the drop-down, click the
and enter the appropriate text on the Add Sex page and Submit . A
confirmation message will appear on screen to let the user know that the
addition was successful. Choosing the select icon will redirect the
information back to the Add Specimen screen. The added information
will be a permanent addition to the list of options. Now choose the
appropriate sex from the drop-down list. Repeat for Add Form and Add
Developmental Stage, adding terms to the drop-downs, as needed.
- View Applicable To (Required)
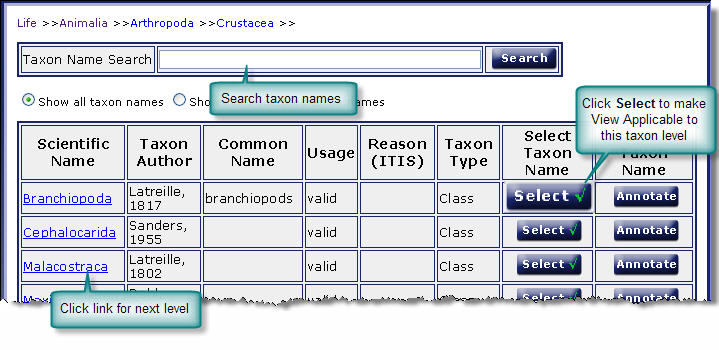
It is possible for a view to be applicable outside of the user's immediate taxon of interest. For example, the view name of lateral habitus, when photographing a wasp, is relevant for Insecta but it can also be applied to Arthropoda, Hexapoda, and perhaps Animalia. The user should decide the highest possible applicable taxon in which they have confidence that the terminology for that view is relevant. In this case, lateral habitus may be useful as a view name through Hexapoda, but may not necessarily apply to images of the side view of all animals.To insure accuracy, taxonomic names need to be selected from Taxon Name Search screen. Select the name of the highest taxon to which this view is applicable. Traverse through the levels until the appropriate scientific name is found. Then click the select icon, it will automatically direct the user back to the add view screen and the appropriate name will be filled in.
- Contributor (Required)
Select the name of the contributor (person having the authorization to release the images) from the dropdown list. The contributor can be different from the submitter (person entering the data). If you need to add new entries to this list, please contact mbadmin at scs dot fsu dot edu. - Add External Links to this record. For complete instructions on providing external links refer to External Linking in the Information Linking section of this manual. Click on Add External Links to open this feature. See next:
- Choose the Type of External Link (some examples are: GenBank, Project, Institution, ...)
- Enter the text for the Label the user in Morphbank will click to go to this URL.
- Enter the complete URL here.
- The Description field is optional.
- Click the + icon to add additional external links.
- Click the - icon to remove any outdated links.
- Add External References to this record. For complete
instructions on providing external references refer to External Linking in the Information Linking section of this manual. Click on Add External References to open this feature. See next:
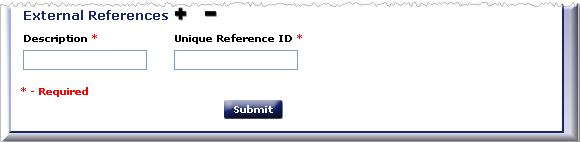
- Enter the Description for the External Reference. This will appear to the Morphbank user as a label in front of the unique id.
- Enter the Identifier unique for this locality in the remote database in the Unique Reference ID field.

- Unique Reference ID best practice is to combine an acronym prefix + an identifier.
- The database table storing this identifier requires the values be unique. If the identifier string entered is already in this table, the user will have to figure out a different prefix.
- For example, a user, Fred S Unstead, has a View with ID=123456 and puts his initials as the prefix for: FSU:123456
- Florida State University (FSU) entered View IDs with prefix: FSU + an identifier (123456).
- Fred S Unstead needs to change his prefix in some way, for example: FSU-V:123456 (where the V is for View).
- The external unique reference ID can be used in future uploads and for updates of current records in Morphbank.
When the Add View form has been completed, Submit to complete the add view process. A message will confirm that you have successfully added a view. From this point the user can continue to add additional views or return to the Submit screen.
Next |
Contents |